원문 : https://blog.goodaudience.com/table-detection-using-deep-learning-7182918d778
Table Detection using Deep Learning
For a specific task I had to solve I recently came across some interesting paper:
blog.goodaudience.com
생전 해본적도 없는 OCR과 Deep Learning을 하게 되었다. 시키는거 해야하는 찌랭이 연구원이기 때문에 얌전히 po구글 검색wer하다가 어떻게 해도 답이 안나오길래 일단 튜토리얼을 진행하기로 했다. 지금 현재 가장 시급한 테이블 인식 부분의 예시가 있어 스터디 겸 해본다.
모태가 되는 논문 : https://www.researchgate.net/publication/320243569_Table_Detection_Using_Deep_Learning
Required Libraires
- Python 3
- Pandas
- Pillow
- Opencv-python
- Luminoth (Tensorflow)
Dataset
지도학습을 통한 딥러닝이기 때문에 학습시킬 데이터가 필요하다. dataset에는 총 403개의 이미지가 있고 csv파일로 테이블의 line과 format에 대해 저장해두었다.


실제로 하나 뽑아서 픽셀을 대조해본다. 5192_089.png 파일을 열어서 좌표를 확인한다.


그림판으로 노가다해서 (까만점이 좌표 위치) 선을 그어본다. 이렇게 얘가 표라는 것을 알려주고 있다.
Preprocessing of images
이제 전처리를 해본다. 다음과 같은 단계를 밟는다.
1. open csv file
2. read in all image file names in that file
그리고 image들은 아래와 같이 하나씩 처리된다.
1. preprocess image
2. save image to data/train(for files from tarain.csv) or to data/val(for files from val.csv)
진행해본다.
import os
import cv2
import pandas as pd

root_dir = os.getcwd()
file_list = ['train.csv', 'val.csv']
image_source_dir = os.path.join(root_dir, 'data/images/')
data_root = os.path.join(root_dir, 'data')

for file in file_list:
    image_target_dir = os.path.join(data_root, file.split(".")[0])

    #read list of image files to process from file
    image_list = pd.read_csv(os.path.join(data_root, file), header=None)[0]

    print("Start preprocessing images")
    for image in image_list:
        img = cv2.imread(os.path.join(image_source_dir, image))
        img = cv2.cvtColor(img, cv2.COLOR_BGR2GRAY)

        b = cv2.distanceTransform(img, distanceType=cv2.DIST_L2, maskSize=5)
        g = cv2.distanceTransform(img, distanceType=cv2.DIST_L1, maskSize=5)
        r = cv2.distanceTransform(img, distanceType=cv2.DIST_C, maskSize=5)

        transformed_image = cv2.merge((b, g, r))
        target_file = os.path.join(image_target_dir, image)
        print("Writing target file {}".format(target_file))
        cv2.imwrite(target_file, transformed_image)
진행하면 이미지들이 이렇게 새까맣게 된다.
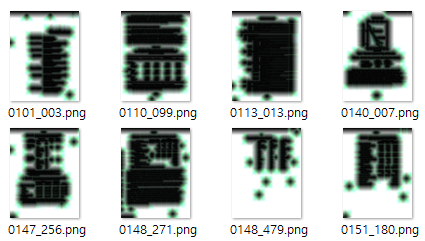
코드를 살펴보면 처음에 grayscale로 변환시킨다. 픽셀은 0~255의 값을 가질 것이고 이 것을 지형의 높낮이로 생각하게 된다. 이후 distanceTransform을 통해 경계선을 찾을 수 있게 된다.
Creating TFRecords for training the network
이제 데이터의 전처리가 끝났으므로 교육을 위한 파일로 만든다. Luminoth framework를 사용하게 되는데 Tensorflow를 기반으로 만들어 진 프레임워크이므로 TFR 코드를 생성해야 한다. (luminoth가 자동으로 해준다고 한다) 커맨드 창에서 lumi 명령어를 이용하여 tfdata를 생성한다.
lumi dataset transform --type csv --data-dir data/ --output-dir tfdata/ --split train --split val --only-c
lasses=table
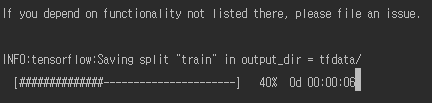
만약 오류가 뜬다면 위에 header를 추가해주자.
image_id,xmin,ymin,xmax,ymax,label제대로 진행되었다.

Training the network
lumi 설정파일을 작성하여 실행해본다.
train:
  # Name used to identify the run. Data inside `job_dir` will be stored under
  # `run_name`.
  run_name: table-area-detection-0.1
  # Base directory in which model checkpoints & summaries (for Tensorboard) will
  # be saved.
  job_dir: jobs/
  save_checkpoint_secs: 10
  save_summaries_secs: 10

  # Number of epochs (complete dataset batches) to run.
  num_epochs: 10

dataset:
  type: object_detection
  # From which directory to read the dataset.
  dir: tfdata/classes-table/
  image_preprocessing:
    min_size: 600
    max_size: 1024
  data_augmentation:
    - flip:
        left_right: True
        up_down: True
        prob: 0.5

model:
  type: fasterrcnn
  network:
    # Total number of classes to predict.
    num_classes: 1
lumi train -c config.yml
엄청 느리니까 긴장 빨자... 노트북으론 한계가 있다. ㅠㅠ
loss가 어느정도 줄어들면 학습이 다 된 것이니 멈추고 새로운 데이터를 시험해본다.
로
스
가
안
줄
어
들
어
.
.
님들은 꼭 GPU 있는 걸로 하세요
Using the trained network to make predictions
이제 체크포인트를 만들어서 학습이 된 친구를 저장해준다.
pdfExtract\data>lumi checkpoint create config.yml
학습된 checkpoint를 이용해 예측을 실행해본다.
lumi predict --checkpoint fad0fad841d1 data\val\9533_039.png\\data\\val\\9533_039.png", "objects": [{"bbox": [230, 88, 1658, 2519], "label": "table", "prob": 0.
987}, {"bbox": [484, 875, 1753, 2414], "label": "table", "prob": 0.9649}, {"bbox": [0, 298, 1103, 2530], "label": "table", "prob": 0.955}, {"bbox": [519
, 987, 1684, 1755], "label": "table", "prob": 0.9341}, {"bbox": [1123, 1551, 2204, 2220], "label": "table", "prob": 0.8954}, {"bbox": [13, 423, 1093, 75
2], "label": "table", "prob": 0.8724}, {"bbox": [51, 337, 1498, 1632], "label": "table", "prob": 0.8584}, {"bbox": [321, 1561, 1725, 2380], "label": "ta
ble", "prob": 0.8111}, {"bbox": [1187, 1157, 2141, 1555], "label": "table", "prob": 0.8071}, {"bbox": [74, 1509, 1086, 2455], "label": "table", "prob":
0.8027}, {"bbox": [965, 1018, 1897, 2304], "label": "table", "prob": 0.7792}, {"bbox": [62, 2015, 1065, 2427], "label": "table", "prob": 0.6675}, {"bbox
": [6, 379, 1095, 1234], "label": "table", "prob": 0.5808}, {"bbox": [1002, 1139, 1893, 1471], "label": "table", "prob": 0.5583}, {"bbox": [0, 367, 1486
, 907], "label": "table", "prob": 0.5441}, {"bbox": [903, 1787, 1892, 2226], "label": "table", "prob": 0.5251}]}
pdfExtract\data>lumi server web --checkpoint fad0fad841d1체크포인트를 이용해 웹서버를 열어보자.
http://127.0.0.1:5000/
표를 찾아내는 것을 알 수 있다.
전혀 모르는 새로운 데이터는 어떨까? 전처리 이후 시도해본다.
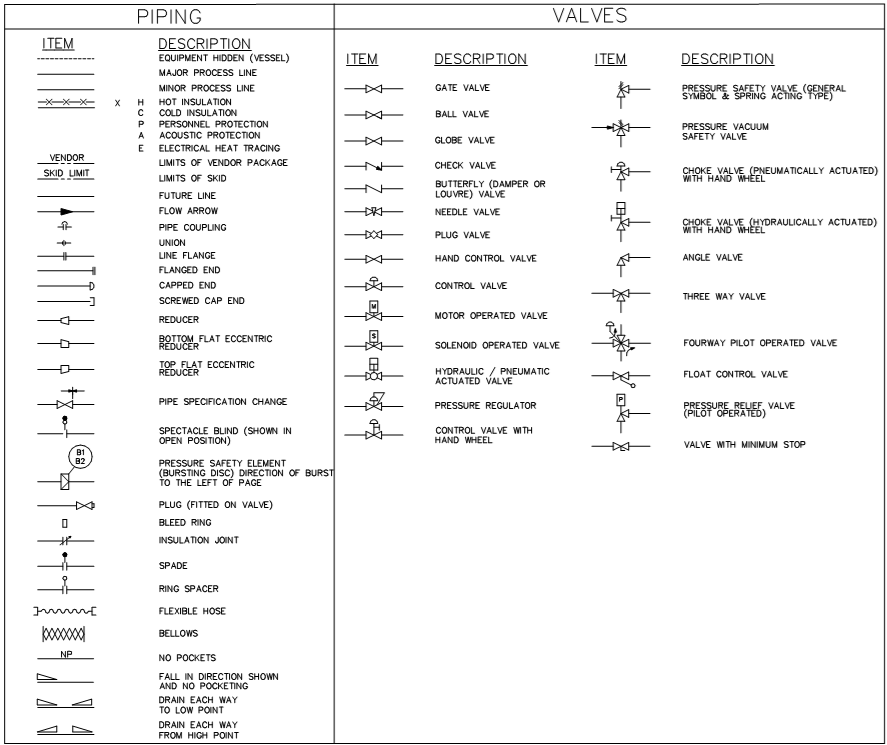
가지고 있던 sample9.png의 전처리를 시도해본다.

음.. 좀 무섭다.....
import os
import cv2

root_dir = os.getcwd()
image_source_dir = os.path.join(root_dir, 'data/images/')
image_list = ['sample9.png']
data_root = os.path.join(root_dir, 'data')

for image in image_list:
    img = cv2.imread(os.path.join(image_source_dir, image))
    img = cv2.cvtColor(img, cv2.COLOR_BGR2GRAY)

    b = cv2.distanceTransform(img, distanceType=cv2.DIST_L2, maskSize=5)
    g = cv2.distanceTransform(img, distanceType=cv2.DIST_L1, maskSize=5)
    r = cv2.distanceTransform(img, distanceType=cv2.DIST_C, maskSize=5)

    transformed_image = cv2.merge((b, g, r))
    target_file = os.path.join('data/val/', image)
    print("Writing target file {}".format(target_file))
    cv2.imwrite(target_file, transformed_image)
잘 되려나 모르겠는데 한 번 해본다.
(잘 안된다) 훈련이 안된 애들은 전반적으로 잘 찾지 못한다. 더 테스트를 돌리거나 다른 방법을 찾아봐야겠다
글 안에서도 tabula-py를 사용해보라고 권유하고 있다.
'Python > DeepLearning' 카테고리의 다른 글
| Python과 2018 교통사고 사망 데이터를 활용하여 지도에 표시해보기 (0) | 2019.07.10 |
|---|---|
| 가상환경에서 tesseract 실행하기 (0) | 2019.05.22 |
| 왜 machine learning에서는 Normal Distributions를 사용할까? (3) | 2019.05.16 |
| Tensorflow 기반 딥러닝 핵심과 활용 (0) | 2019.05.15 |
| TensorFlow 교육 - 2일차 (0) | 2019.05.14 |


